April 20th, 2007 by Steve
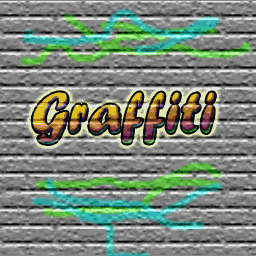
This article describes a quick way to create graffiti on a brick wall using Photoshop. If you are going to use text, you may want to use a font that resembles graffiti. Several free ones can be found on dafont.com. For best results, choose one that is somewhat thick.
Start a new document, with a background 50% gray (or whatever color you want your brick wall to be) in color. Add another layer and write your text (in the example I used a font size of 60 px) or draw your artwork in black.

Next up, 4 layer styles. First, add a gradient overlay (blend mode normal). The one in the example is the preset Yellow, Violet set at an angle of 97.
Second style – add a black 2 pixel stroke (position=outside). You’ll have something like this:

Third style – add an outer glow (default light color or white): Under elements, size set at 8px, Under quality, range set at 10%. Blend mode is normal. Depending on you font size, you may want to try other values.
The fourth style in inner shadow. Blend mode should be set to difference, the angle around -72 degrees, with global light checked. Set distance to 2px, and size to 3px. You’ll have something like this:

If you want to try other gradient overlays, now is the time. Once you like the way your creation looks, make a blank layer and merge it with the layer you just created the artwork on. This flattens the styles. (I sprayed a little faded brush around for the heck of it)
With the new layer selected, find filter-texture-texturizer in the menu. Set the texture for brick, 175%, relief at 6 and click OK.
Click the first layer (50% gray) and go to the texturizer again, but this time change the relief to 8.

You’re done!
Posted in | 15 Comments »
April 19th, 2007 by Steve
Suppose you want to add a rollover banner ad on your site and would rather do it with CSS (Style Sheets) instead of javascript. Start by creating an image that is twice as wide as the banner, so that it loads all at once and there is no delay on the mouseover:

Next, add the following lines to the stylesheet:
	.rollover a {

display:block;

width: 234px;

height: 60px;

background: url("/ads/banner-free-tiles.gif") 0 0 no-repeat;

float: right;

}

.rollover a:hover {

background-position: -234px 0px;

}
The height and width match the size of the ad. The actual image is twice as wide (468×60). The a:hover pseudo-class moves the image 234 pixels to the left, showing the right half during a mouseover.
Add this code where you want the ad to appear:
<span class="rollover"><a href="http://xanadu-fx.com/tiles/" title="Free Background images"> </a></span>
and you should see this:
You can also use this technique to make rollovers in menus, but I prefer to use text based links in navigation for accessibility reasons. Also, you can stack the images vertically, but be sure to adjust the code in “a:hover” accordingly so the image moves up instead of left.
Posted in | 10 Comments »
April 17th, 2007 by Steve
This site will have graphics and web design tips, tutorials, along with free files and templates. These will be useful for building web sites or for using graphics applications like Photoshop, Fireworks, Flash, Bryce 3D, Swishmax, Dreamweaver and even MySpace. Eventually sections for Drupal, WordPress, Livejournal and other related Content Management or blog applications will be included.
The first freebies are online! Check out the free MySpace codes and layouts here. Also, several dozen seamless textures are online in the tiles subdirectory of xanadu-fx.com. Use these anywhere a seamless texture would be used. They can be used as backgrounds in web pages (including MySpace), backgrounds on Windows desktops, or even as materials in 3D software such as 3DS Max, Bryce 3D, trueSpace, or Blender. Also, these images can be used as textures in maps for computer games such as Unreal, Counter-Strike or any other programs that have the ability to import images.
TIP: Use Photoshop or free image editors such as IrfanView to change the hue, saturation, contrast, brightness or other qualities to fit your needs.
Posted in , | 1 Comment »
January 5th, 2007 by Steve
Posted in | No Comments »


